

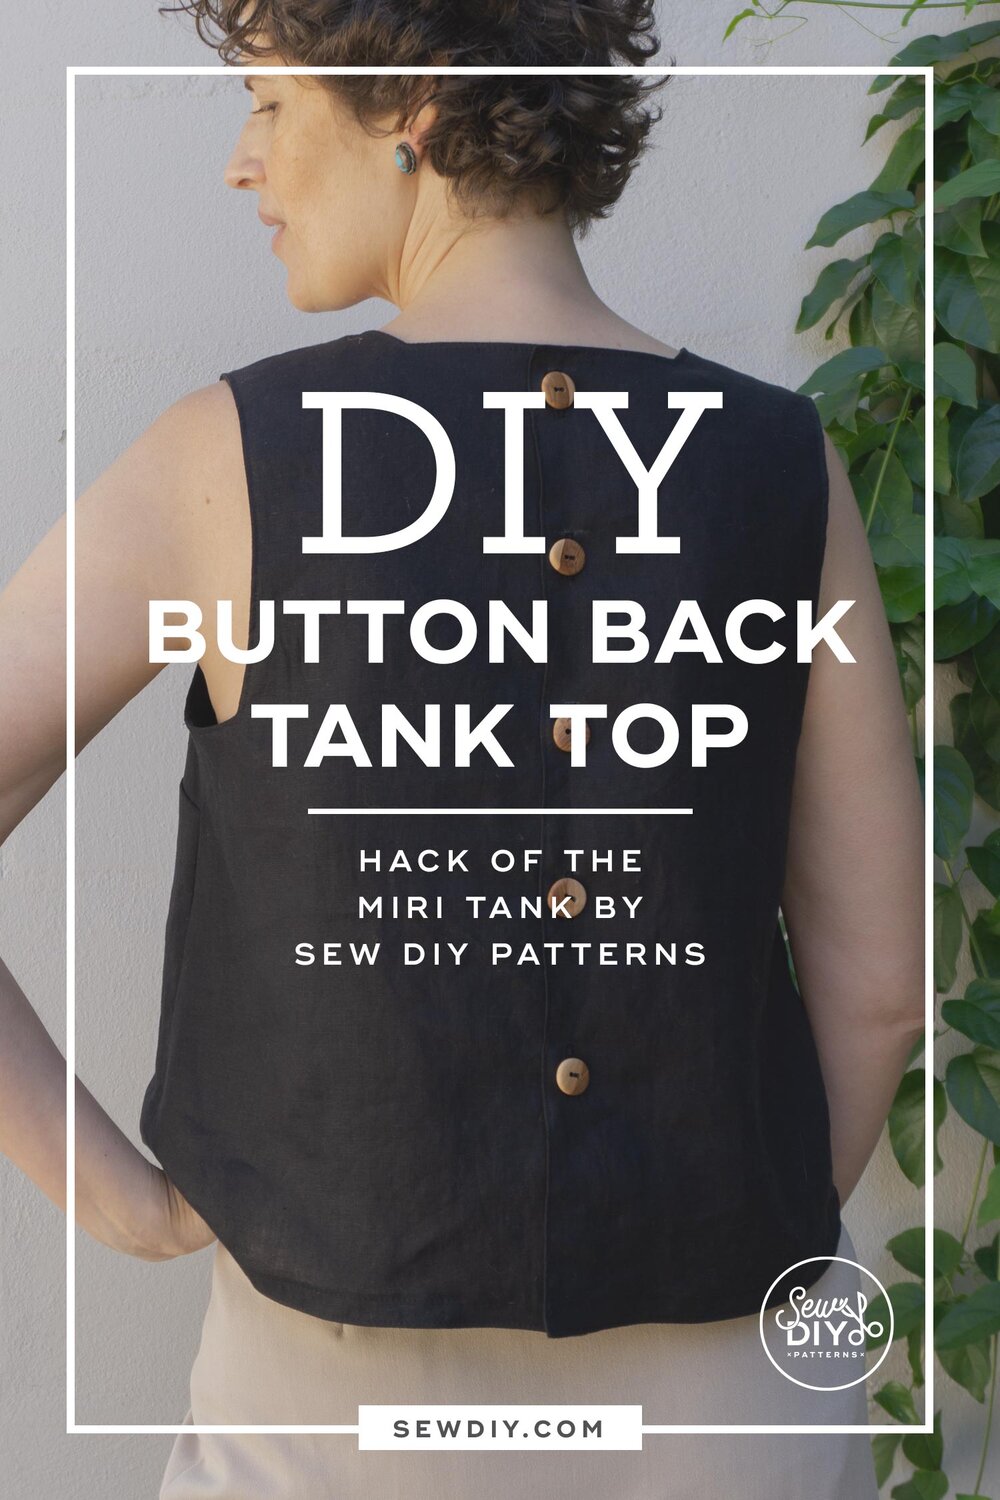
Today, I'm very excited to share a hack for my latest pattern, the Miri Tank. The Miri is a woven tank with a slight A-line shape, a bust dart in the side seam and is finished with a facing. View A features a rounded neck and armholes and view B has a v-neckline and squared off armholes and back neck edge. The basic features of the tank make it great for hacking and modifying.
BUY THE MIRI TANK TOP PDF PATTERN HERE.

This hack was inspired by a tank top that I made in the early days of my sewing journey, the ol' 1990s. The pattern was Butterick 4553 and it was one of my most successful, i.e. wearable, makes. That top featured a square neck and a button band so that's what I'm doing for this hack. In fact, that tank was part of the inspiration for designing the Miri Tank. I was looking for a garment that would be a successful, satisfying make for a beginner sewist. I knew that a woven tank, finished with a facing would be perfect.

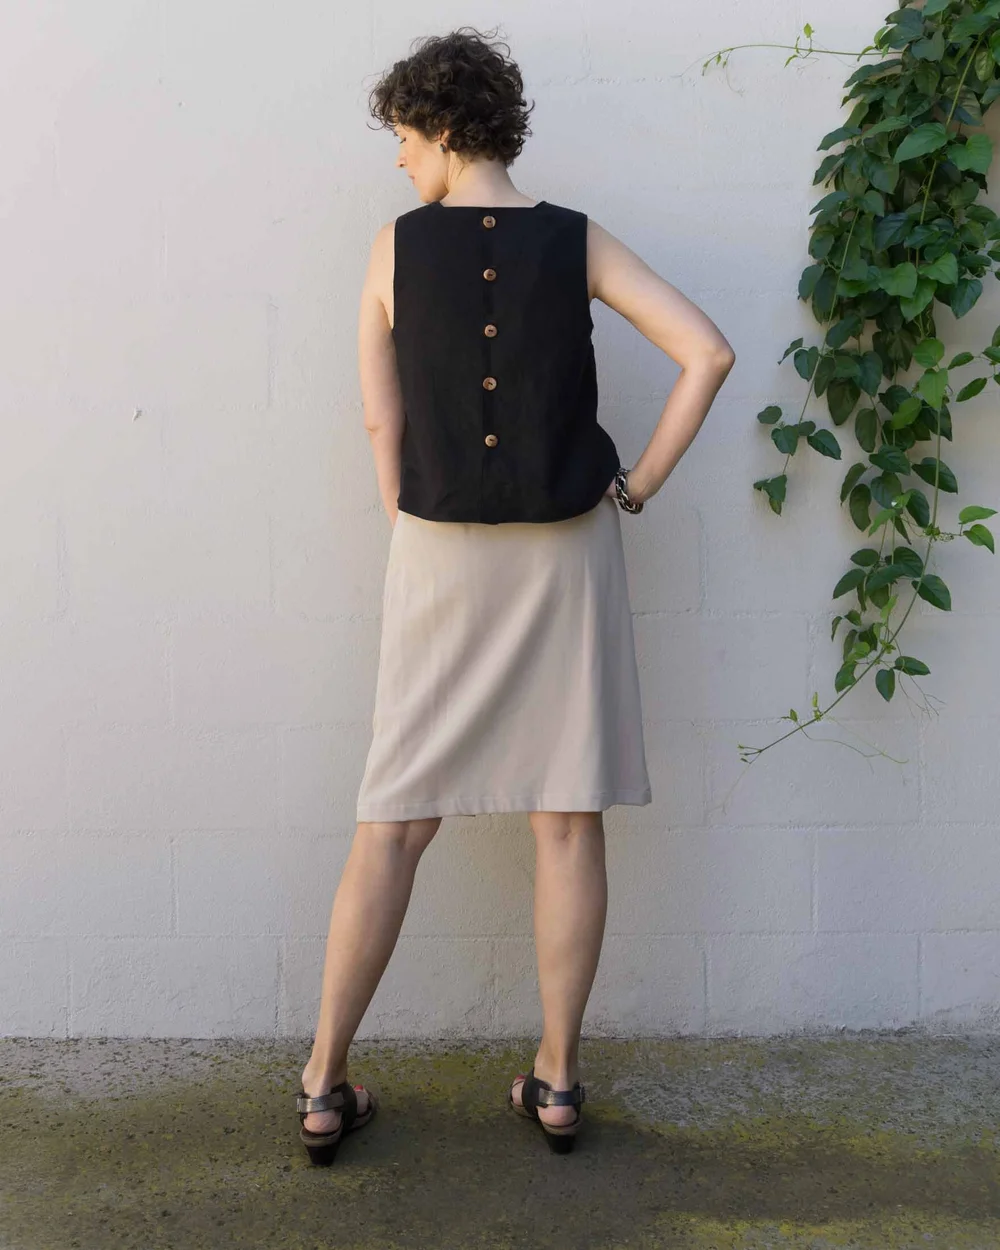
For this hack, I started with view B and made the front neckline square and then added a button band to the back using a grown-on facing. I love how this tank turned out and have been wearing it pretty constantly since I finished. In this post, I'll show you how to draft and sew this hack using the Miri Tank as a base.
In this tutorial, we’ll start off by making changes to the pattern and then I’ll show you how to sew it all together. Sewing this hack is not as easy as sewing the regular version of the Miri Tank but it’s kind of fun and this construction method gives a really clean finish.
How to draft the square neck, button back Miri Tank
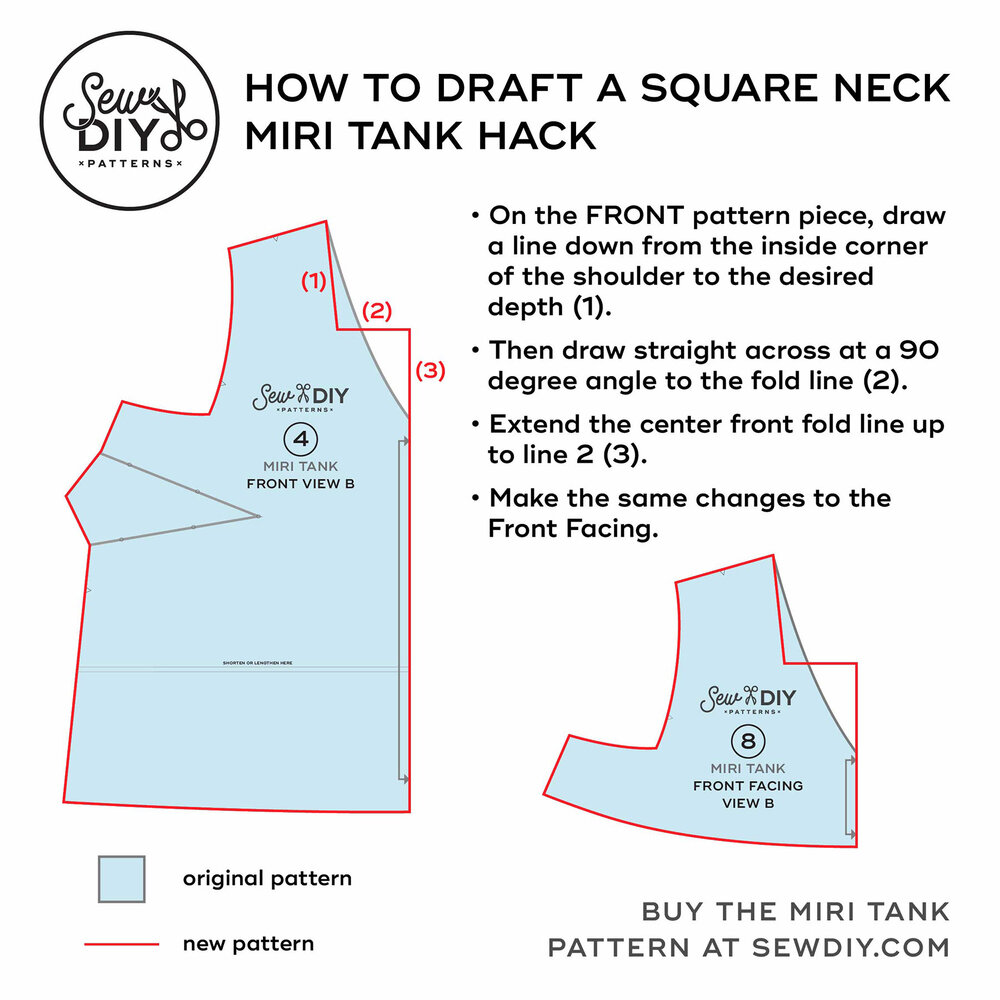
Part 1: Draft the front neckline
First we want to determine how deep we want the neckline to be. Using a flexible measuring tape, measure from the shoulder seam down to the point that you want the neckline to start. For mine, I did 4.25".
On the pattern, draw a line down from the inside corner of the shoulder to the desired depth. Then draw straight across at a 90 degree angle to the fold line. Make the same changes to the Front Facing.
Btw, I have a video about altering a neckline and facing, using my Dana Jumpsuit pattern. You can check it out here.

Part 2: Draft back with facing
Note: To make things easy, I'm drafting this with a 1.25" wide button band. In other words, the two back pieces will overlap 1.25" at the center back. We are taking advantage of the seam allowance already at the center back to create our overlap. If you want a larger overlap, you'll need to add additional width to the center back of the pattern.
Reflect or mirror the back pattern piece along the cut line. Label the old cut line the fold line.
The new mirrored part of the pattern will be the facing and we need to remove the excess. Draw in a new line starting 2.75" to the right of the fold line and ending on the side seam, 2.75" below the armpit. Cut away the excess.

For this Miri Tank, I used a lovely black linen that was gifted to me by The Fabric Store when they had their shop here in LA. I miss being able to go to their shop. They had the most beautiful linens! Linen is a great fabric for this pattern and for warm weather. It’s really easy to sew with and is breathable.
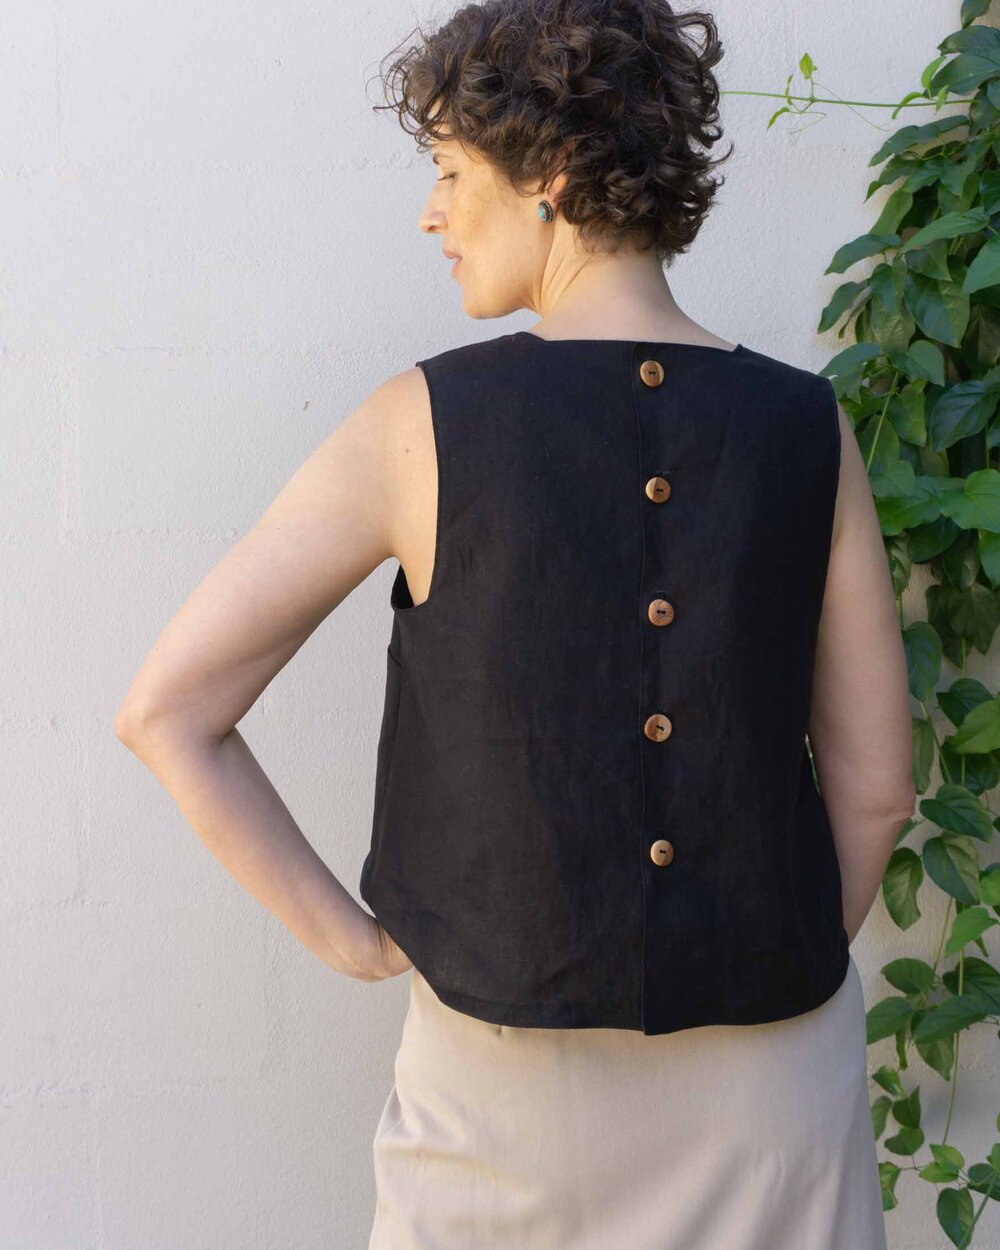
The buttons are very special. I bought these two years ago when I was Tallinn, Estonia. I only got to spend one day there, but I loved Tallin and hope that I get to return one day. I found this buttons in a little gift shop in the old city area. They are so beautiful and the perfect souvenir. I love how they stand out against the black fabric. I bought 10 buttons and only used five here because, well, five just looked perfect. For the next five buttons, I should use them on the front of the garment so that I actually get to see them while wearing it.
Sewing the button back hack
Note: To use this construction method, do not make the width of the shoulders smaller, as you may not be able to turn the top right side out.
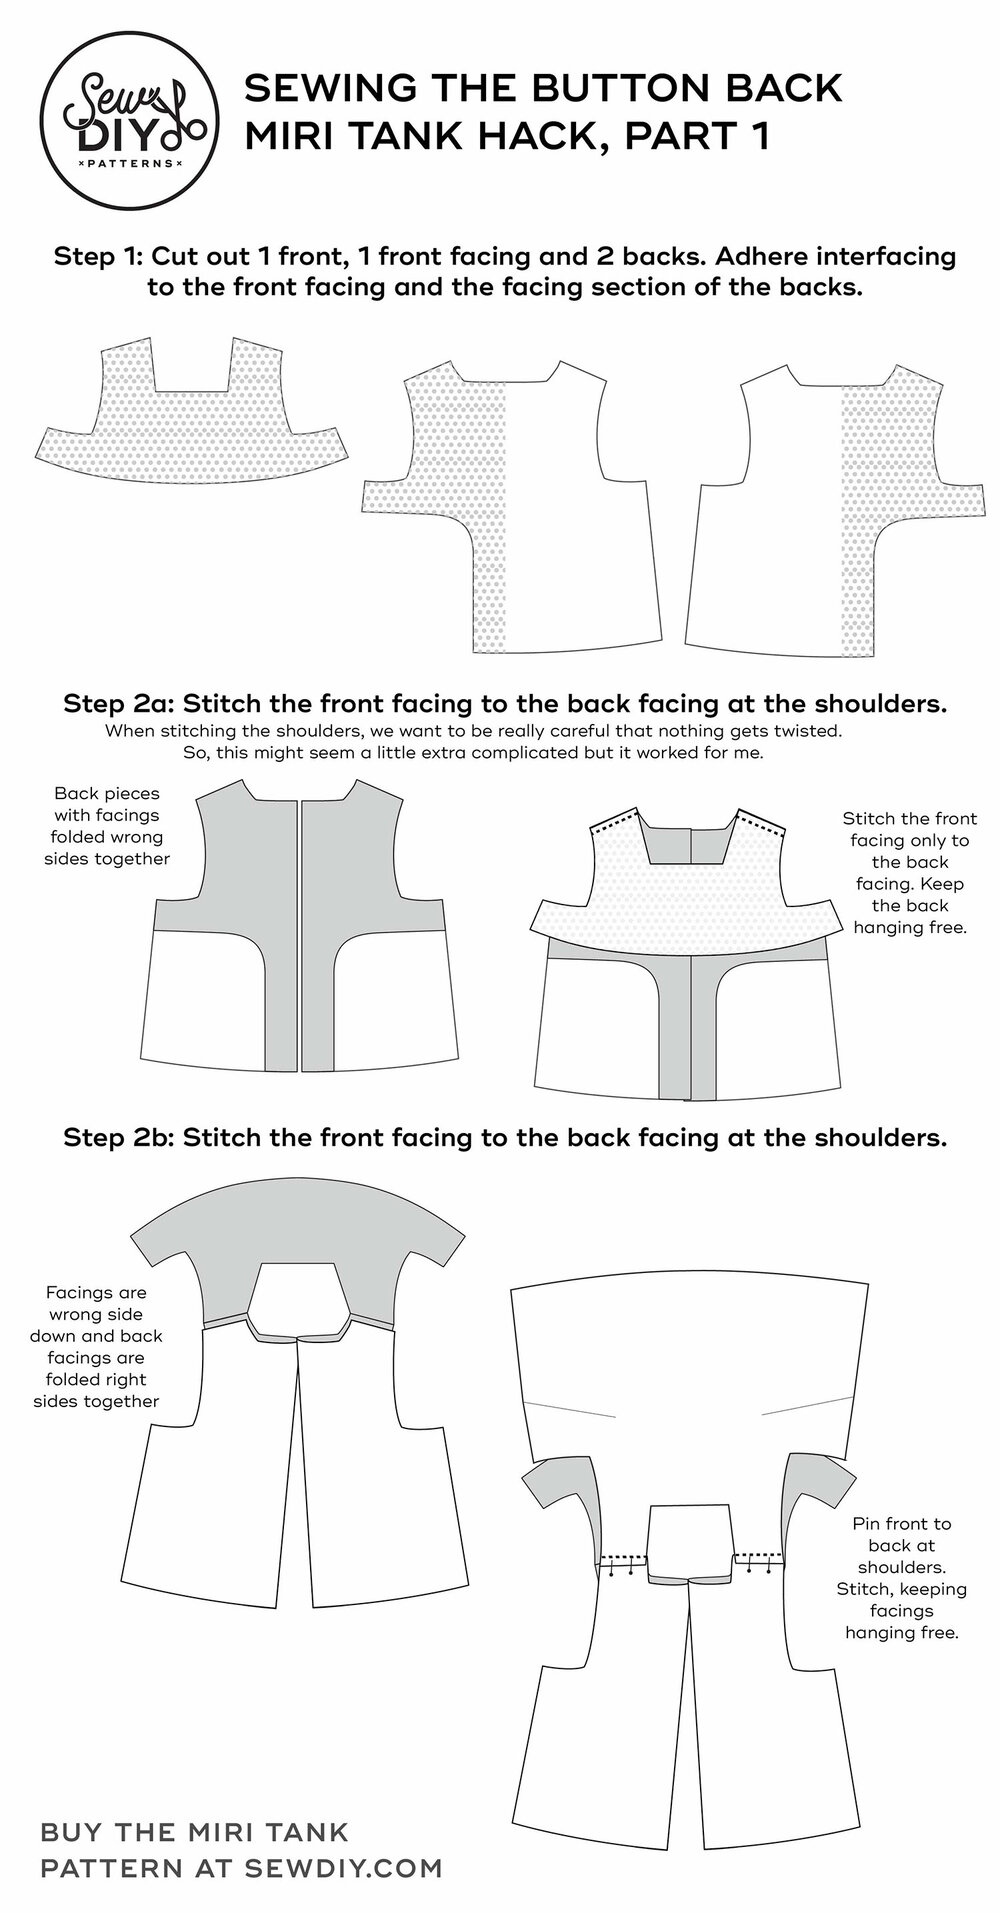
Step 1: Cut out 1 front, 1 front facing and 2 backs. Adhere interfacing to the front facing and the facing section of the backs.
Step 2: When stitching the shoulders, we want to be really careful that nothing gets twisted. So, that's why the instructions are very detailed here and give a game plan for keeping everything not twisted.
Lay the backs right side down on a table. Fold back the facings so that wrong sides are together. Place the front facing down with the wrong side up. Pin the front facing to only the back facing at the the shoulders. Stitch.
Lay the facings wrong side down on a table. Fold the back pieces along the fold line with right sides together. Lay the front piece on top of the front facing with the right side down. Pin the front to the backs at the shoulders with right sides together. Stitch. Press shoulder seams open.

Step 3: Lay the top down on a table with the facings on top and right sides together. Pin, matching notches and shoulder seams. Stitch the neckline and armholes, pivoting at the corners.
For more accurate stitching, mark the seam line using a washaway pen on the facing (the interfacing side). Then stitch with the interfacing up. Clip the corners and grade the seam allowances. Understitch as far as possible. (Or, if you'd like to topstitch, you can skip understitching. That's what I did.)
Step 4: Now it's time to turn the top right side out. Lay the top down on the table with the facings up. Grab the bottom corner of one back piece and push it in between the facing and the top as far as possible. Then reach under the front facing and grab the back piece. Gently pull it all the way through. Repeat for the other side and press.
Step 5: (Optional) I decided to finish the hem with bias strips. I cut 1.25" inch wide strips of fabric and pieced them together to get one long strip that was as long as the hem. At the hem, fold the back facing right sides together along the fold line. Pin and stitch the facing to the hem. (I used a .25" seam allowance.) Repeat for other side.
Then, before you turn it right side out, stitch the bias strip to the hem using the same seam allowance. Turn the facing right side out and press. Press the bias strip to the wrong side and press the raw edge under about .25 inch. Topstitch close to the folded edge of the bias strip.
Step 6: (Optional) Topstitch around the armholes. In one single line, topstitch around the neckline, back facings and close to the hem (this will create two lines of stitching at the hem).
Step 7: Mark buttonholes and stitch. Attach buttons. For help sewing buttonholes and buttons, check out this video.
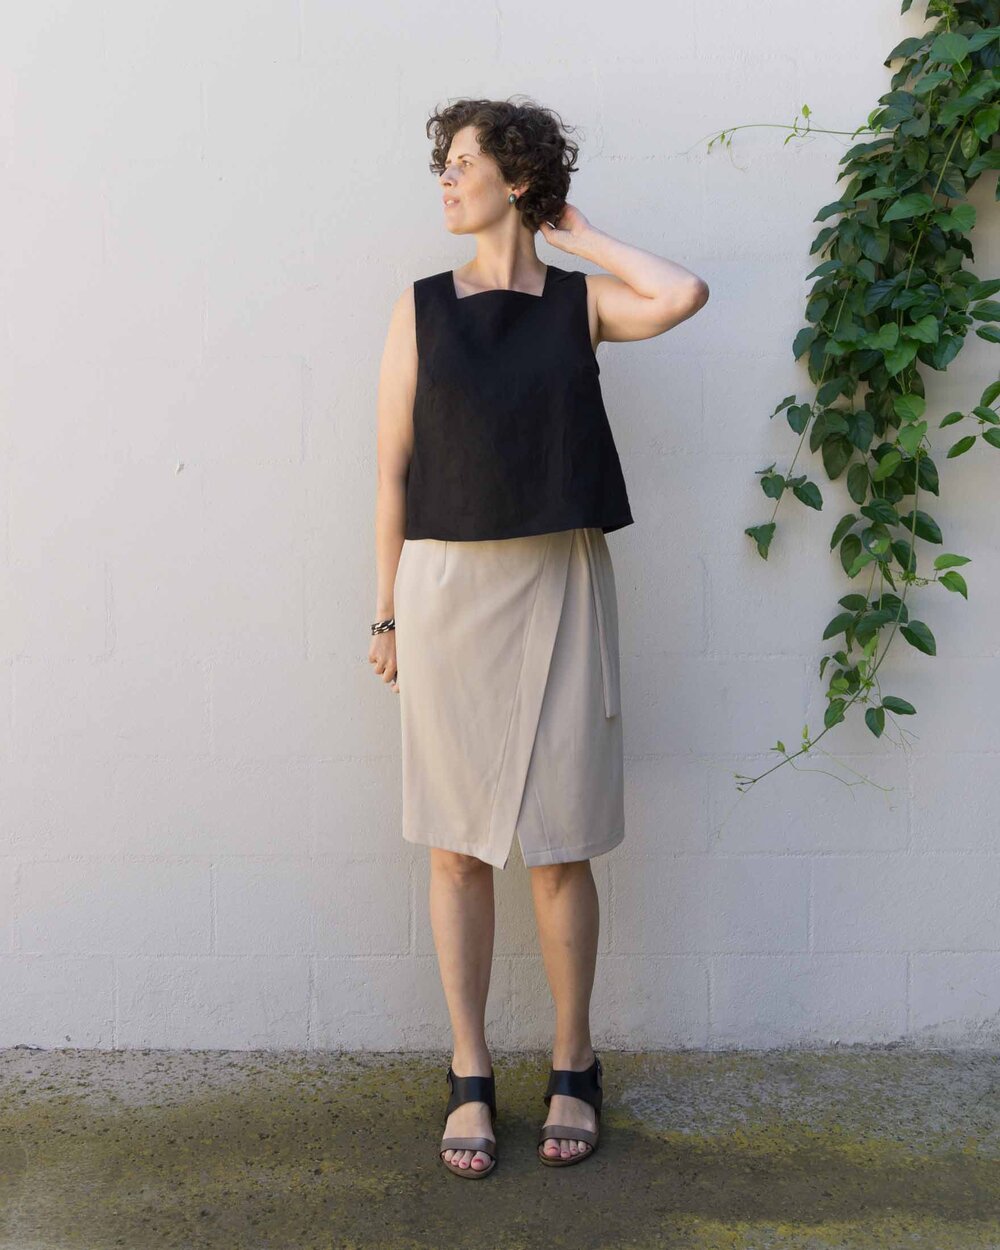
I hope you’ve enjoyed this pattern hack. I have LOVED wearing this top. I must admit that it’s much more chic than the tanks I made in the 90s out of floral quilting cotton. They were pretty but this one has a greater air of sophistication. In the photos, I’m wearing the tank with my Nita Wrap Skirt. I think they make a great match! If you haven’t gotten your copy yet, you can get the Miri Tank pattern in the shop. Happy sewing!